|
|
![]()
Monitors and Tests
11.1 Overview
A monitor is a process that runs one or more categories of tests with similar functions. Each type of test is identified by the name of the monitor that runs it and the Test Subtype, a unique identifier within the monitor.
For example, the Port Monitor can run tests of several subtypes: Advanced Port Test, FTP, HTTP, HTTPS, IMAP, IMAPS, etc. When you create a new FTP test for a device, NetVigil uses the test's Test Type/Subtype combination (Port/FTP) to look up provisioning information for this category of tests.
NetVigil provides standard monitors for network, servers, applications and URL transactions. (You can easily add new monitors with the plugin framework described in Chapter 19, "Plugin Monitors") Efficient and multi-threaded, the standard monitors are designed to minimize the impact of traffic monitoring on your network. The use of NetVigil tests does not result in a significant increase in resource utilization for the devices being polled because default time intervals are set to provide an accurate picture of device functioning without burdening the system.
NetVigil is designed to work with SNMP agents such as Empire, UCD, or BMC Patrol, and recognizes MIBs from a variety of standard devices such as Compaq servers and Cisco routers. Note that while information can be gathered from a device's private MIB, some MIBs do not provide enough information to enable the same array of tests that a standard SNMP agent would allow.
NetVigil's SNMP monitor is an extremely fast, multi-threaded poller with support for 64bit counters where available and also account for the rollover of 32bit counters. Multiple SNMP queries to the same host are sent in the same SNMP packet for speed and optimization. An alternate SNMP port can be queried instead of the default if needed.
In addition to using NetVigil's standard monitors or creating new ones to poll for data, you can insert numeric data into the system is via the External Data Feed (EDF) described in Chapter 15, "External Data Feed (EDF) Reference". NetVigil can also accept SNMP traps and scan log files for specific patterns (regular expressions) via the Input Stream Monitor (ISM) which is described in Chapter 16, "Input Stream Monitor (ISM) Server Reference".
11.1.1 Network Monitors
Frame Relay & ATM
- DLCI status, discards, traffic
Firewalls
- Packets accepted, rejected, drops, active connections, CPU utilization
Wireless Access Points
- Associated stations, Neighbor counts
BGP Route Monitor
- BGP peer state (connected or failed), route flaps (rate of routing updates)
RIP Routing Monitor
- RIP route changes, bad routes received.
ICMP Round Trip Time
- Average time of 5 packets sent at 1 second intervals of 100 bytes each. Measured in milliseconds.
ICMP Packet Loss
-% of packets lost out of 5 packets sent at 1 second intervals of 100 bytes each.
Bandwidth Utilization by Interface
-% of total network bandwidth, both incoming and outgoing, calculated by the delta bytes between each sample.
Throughput by Interface
- number of packets per second.
Interface Errors
- CRC error rate (per minute) calculated by the delta between sample intervals.
Environment
- Cisco, Foundry chassis temperature, fan status, power supply
SNMP Traps
- Customizable trap handler which assigns a severity to received traps based on a customizable configuration file and inserts into the system.
11.1.2 Server Monitors
RPC Portmapper
- Check if the RPC portmapper is running on a Unix host (a better alternative to icmp ping for an availability test).
CPU load
- Average % per minute.
Disk space
-% of total disk available for each partition; does not show total size.
Physical Memory
-% of physical memory used.
Virtual Memory
-% of virtual memory used.
Paging/Memory Swapping
- number of page swaps per unit time.
LAN Manager
- Authentication failures, system errors, I/O performance, concurrent sessions.
Compaq Insight Manager
- RAID controller information, CPU, Network errors.
Printers
- printer health, paper tray capacity, cover status, available storage
11.1.3 Application Monitors
Oracle database
- table size, transaction rate, query rate, aborted transactions, errors.
Apache Web Server
Server traffic, utilization, requests per second, average data bytes per request
Poet OQL database query
- measures query response time; Required input: legitimate username, password, database name, and proper OQL query syntax.
LDAP database query
- connects to any directory service supporting an LDAP interface and checks whether the directory service is available within response bounds and provides the correct lookup to a known entity. Required input: base, scope and filter.
Generic SQL query
- measures query response time; Required input: legitimate username, password, database driver selection, database name, and proper SQL query syntax. Supports Oracle, Sybase, SQL Server, Postgres, MySQL
Microsoft SQL Server
- State, transaction rate, write operations performance, cache hit rate, buffers, concurrent users, available database and log space
Microsoft Exchange Server
- Traffic, ExDS statistics, Address book Connections, LDAP queries, queue, connections, thread pool usage, failures, disk operation.
Microsoft Internet Information Server
- Traffic, active users, request statistics, connections.
DHCP Monitor
- Check if DHCP service on a host is available, whether it has IP addresses available for lease and how long it takes to answer a lease request, request statistics where available.
URL transaction monitor
- measures time to complete an entire multi-step URL transaction. Can fill forms, clicks on hyperlinks, etc. Works with proxy and also supports https.
HTTP
- Hypertext Transport Protocol - Monitors the availability and response time of HTTP Web servers. Checks for error response.
HTTPS
- HTTP Secure Socket Layer - This monitor supports all of the features of the HTTP monitor, but also supports SSL encapsulation, in which case the communication is encrypted using SSLv2/SSLv3 protocols for increased security. The monitor will establish the SSL session and then perform HTTP tests to ensure service availability.
SMTP
- Simple Mail Transport Protocol - Monitors the availability and response time of any mail transport application that supports the SMTP protocol (Microsoft Exchange, Sendmail, Netscape Mail.)
POP3
- Post Office Protocol (E-mail) - Monitors the availability and response time of POP3 E-mail services. If legitimate username and password is supplied, will login and validate server response.
IMAP4
- Internet Message Access Protocol - Monitors the availability and response time of IMAP4 E-mail services. If legitimate username and password is supplied, will login and validate server response.
IMAPS
- IMAP Secure Socket Layer - This monitor supports all of the features of the IMAP monitor, but also supports SSL encapsulation, in which case the communication is encrypted using SSLv2/SSLv3 protocols for increased security. The monitor will establish the SSL session and then perform IMAP tests to ensure service availability.
FTP
- File Transport Protocol - Monitors the availability and response time of FTP port connection. Connection request sent, receives OK response and then disconnects. If legitimate username and password is supplied, will attempt to login and validate server response.
NNTP
- connects to the NNTP service to check whether or not Internet newsgroups are available, receives OK response and then disconnects.
Generic Port
- Any TCP port can be monitored for a response string.
NTP
- Monitors time synchronization service across the network. The monitor queries the NTP service on any server and returns the stratum value.
RADIUS
- Remote Authentication Dial-In User Service (RFC 2138 and 2139) - performs a complete authentication test against a RADIUS service, checking the response time for user logon authentication to the ISP platform. Required input: secret, port number, username and password.
DNS
- Domain Name Service (RFC 1035) - uses the DNS service to look up the IP addresses of one or more hosts. It monitors the availability of the service by recording the response times and the results of each request.
11.1.4 Custom Monitors
You can extend NetVigil's monitoring capabilities in several ways:
External Data Feed (EDF) Monitors
Use the EDF Server to insert numeric values into NetVigil via a socket interface. The inserted data is treated as if it were collected using standard monitors.
Input Stream Monitors (ISM)
Use the ISM Server to insert text strings (e.g., SNMP traps or syslog messages) into NetVigil via a socket interface. The inserted data is treated as if it were collected using standard monitors.
Plugin Monitor Framework
You can write a custom monitor as a Java class, or as an external script/programming in any programming language.
11.2 Managing Standard Tests
Before You Provision Tests
Your User Group privileges determine whether or not you can create your own actions. Assigning actions to tests can be done in several ways, but all require that an action has already been created either by you or by your User Group administrator. Options include:
- Assign your custom action to one or more tests during the test provisioning process.
- Assign an admin-created default action to one or more tests during the test provisioning process. This option will appear as an action option in the drop down list on the Configure Tests page.
- Update individual tests using a custom or default action after tests have been provisioned.
- Mass update all tests on a device a custom or default action after tests have been provisioned.
- To create a new test for a new device:
- Create a new device, as described in "To create a new device" on page 12-15.
- Proceed with the test discovery process.
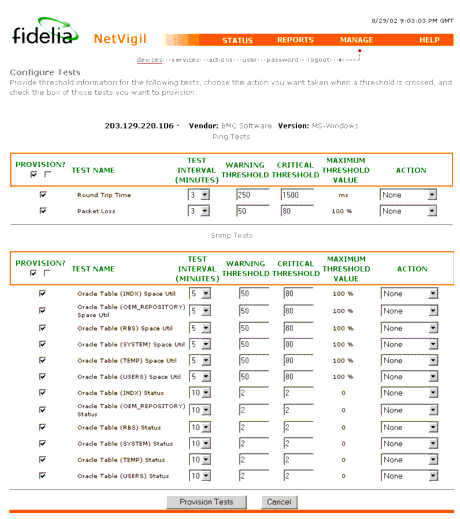
- Check the box next to each test you want to create. Default test intervals and thresholds will have already been selected by your administrator. If your account belongs to a User Group that allows you to modify the defaults, make any desired changes.
- Use the drop-down box to select an action for the test.
NOTE You must have already created an action prior to assigning it to a test. If you haven't yet created any actions, do one of two things:
- Cancel the test creation process by clicking the Cancel button on the Configure Tests page and follow the instructions detailed in "To create a new action:" on page 12-24 to create an action.
- Continue with test provisioning and update the tests later.
- Click on the Provision Tests button to confirm the test provisioning.
Configure Tests Page
- To add more tests to an existing device:
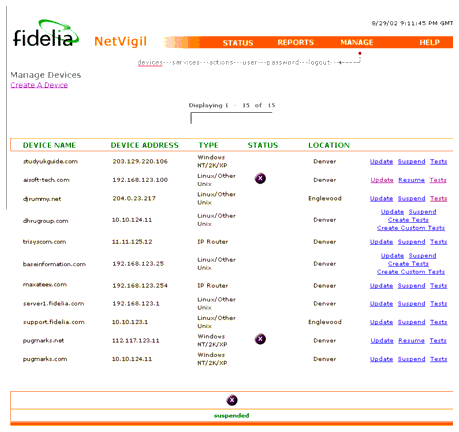
- Go to the Manage Devices page by selecting the ADMINISTER tab on the main navigation bar.
- Click on the Tests link for the desired device and NetVigil will perform an automated test discovery, taking you to the Configure Tests page.
- Check the box next to each test you want to create. Default test intervals and thresholds will have already been selected by your administrator. If your account belongs to a User Group that allows you to modify the defaults, make any desired changes.
- Use the drop-down box to select an action for the test. Refer to the note on actions in Section 11.2, "Managing Standard Tests" on page 11-5 for action assignment options.
- Click on the Provision Tests button to create the new tests.
- To update an existing test:
- Go to the Manage Tests page for the device being tested (see Figure 11.2).
- Click on the Update link for the test you want to modify and you will be taken to the Update Test page.
- Make the desired changes.
- Click on the Update button to complete the changes.
Manage Tests Page
- To suspend or activate a test:
- Go to the Manage Tests page for the device being tested.
- Click on the Suspend or Activate link for that test. If the test is currently active, the link says Suspend. If the test is currently suspended, the link says Activate.
- To delete a test:
- Go to the Manage Tests page for the device being tested.
- Click on the Delete link for the test and you will be taken to a confirmation screen.
- Click on the Delete button to confirm the deletion.
- To create a custom schedule for a test:
- Go to the Manage Tests page for the device being tested.
- Click on the Update link for the test and you will be taken to the Update Test Screen.
- Click on the Manage Schedules link. This brings you to the list of schedules for which devices can be selected to follow these schedules.
You can also create a new schedule using the create a new schedule link. The schedule can be created to allow/disallow monitoring for each 24x7 hours in a week.
11.3 Managing Advanced Tests
11.3.1 Monitoring Log Files for Patterns
You can configure NetVigil to watch text log files for specific patterns and raise alarms or take other action when a match is found. (Pattern matching is Perl 5 compliant.) This process has three steps, which are detailed in the paragraphs that follow:
- Configure the DGE so that is recognizes the log file(s) to be scanned. This step must be performed by the NetVigil administrator as described in Section 3.6, "Monitoring Log Files" on page 3-16.
- Create a list of regular expressions (patterns) to watch for
- Create a Regular Expression test to take appropriate action when a match is found
- Configure the DGE so that is recognizes the log file(s) to be scanned:
This requires editing
NETVIGIL_HOME/etc/dge.xmlon the DGE and must be performed by the NetVigil administrator as described in Section 3.6, "Monitoring Log Files" on page 3-16.A Regular Expression test can match multiple patterns. For example, if you wanted to watch for various security violations, you might name the regular expression Security Violations and enter the following two patterns:
:\d+\s+(\w+)\s+sshd\[\d+\]:.*:\s+(illegal user .*)    WARNING
:\d+\s+(\w+)\s+.*%SEC-6-IPACCESSLOGP:\s+(.*)\s+       CRITICAL
When you configured a test to monitor the Security Violations regular expression, the test would take action when either pattern was matched. If the first pattern was matched, test status would be Warning. If the second pattern was matched, test status would be Critical.
- Click
MANAGE | Devices.- On the Manage Devices page click Tests (for any device).
- On the Manage Tests page, click Create New Advanced Tests.
- In the Regular Expression Test area of the Create Advanced Tests page, click Manage Message Regular Expressions.
- On the Manage Message Regular Expressions page, click Create a Message Regular Expression.
- On the Create Message Regular Expression page, enter a Name and Description for the expression(s) you want to watch for.
- If you want an alarm to appear in the Alarms/Messages window when a pattern is matched, select the Display in Message Window? option.
- For each pattern that you want to match, enter the following:
- Click Create Regexp. The Manage Message Regular Expressions page displays the newly-added expression.
- Create a Regular Expression test to take appropriate action when a match is found
Now that you have configured the DGE to scan the necessary file and created a list of patterns to scan for, you can create a Regular Expression Test.
- Click
MANAGE | Devices.- On the Manage Devices page, find the device for which you want to create a test and click Tests.
- On the Manage Tests page, click Create New Advanced Tests.
- On the Create Advanced Tests page, select the Regular Expression Test option, fill in the test name, and then fill in the following:
- Click Provision Tests.
11.3.2 Processing SNMP Traps
SNMP traps that are received by NetVigil are treated similar to log files or text messages and handled by the Input Stream Monitor (ISM) for further processing. In order to take actions against a trap, you will need to create a regular expression pattern and then create a test to trigger an action when a regular expression pattern is matched.
NetVigil will only accept and process SNMP traps from devices it knows about. If a trap is received from a device that is not configured into the provisioning database, the trap is silently ignored. If you want to monitor SNMP traps from a certain device, and not perform any proactive monitoring, simply add the device in NetVigil without creating any tests (e.g. ping, snmp, etc.).
Remember that you must be logged in as (or representing) an End-user in order to apply an action to a test or create devices and tests.
This process has three steps similar to the processing of log files described above. These steps are:
- Configure the DGE so that is accepts incoming traps. This step must be performed by the NetVigil administrator.
- Create a list of regular expressions (patterns) to watch for
- Create a Regular Expression test to take appropriate action when a match is found
- Configure the DGE so that it processes incoming traps:
This requires editing
NETVIGIL_HOME/etc/dge.xmlon the DGE and must be performed by the NetVigil administrator.You should create a list of regular expressions to match the incoming traps similar to the procedure described above in Log File Monitoring.
Each varbind of a trap is passed to the ISM in the following general format:
If DNS resolution is disabled, or DNS resolution failed,
host_namewill be the IP address. A regular expression pattern likeTRAP:\s+\d+\s+(\S+)\s+(.*)would match all traps. For example, if you have a Cisco router that you wish to watch for link up/down traps via CISCO-SYSLOG-MIB, you would create the following match pattern:
If DNS resolution is disabled, you will need to add the IP address (may be different from IP address of router as configured in NetVigil if "source interface" for SNMP traps is different) in the list of device aliases. When Serial0/0 loses link, a trap is received, and the following message is displayed in the message window with warning severity:
Similarly, when the link comes up again, the following message is displayed:
Lastly, you need to create a Regular Expression Test to trigger an action when a regular expression match is found. This procedure is similar to the one described above for Log File Monitoring.
As an example, if you wish to receive notification via E-mail when a particular trap is matched, you can assign an action profile with an E-mail notification to the pattern match test. A sample E-mail may look like this:
Note that E-mail notification for SNMP trap/pattern match are bound by the parameters of the action profile. If the E-mail action has
don't repeat itset for repeat frequency, then only the first match would be E-mailed. For trap specific action profile, the repeat frequency should beevery test.11.3.3 URL Transaction Tests
You can create a URL transaction test in NetVigil which can connect to a web site, fill in a form, click on various hyperlinks, etc. so as to simulate a real user. This is a very powerful feature in NetVigil which allows testing the response time and errors in most web enabled applications.
The system is fairly intuitive with context sensitive help and has a mini-browser that displays the various stages of the URL transaction. You can then save and even export/import this transaction for other sites.
11.3.4 Advanced SNMP Tests
NetVigil automatically detects standard MIBs and their tests. To run a test that is part of a vendor-specific MIB, you can create an Advanced SNMP Test containing the OID of the vendor-specific test.
- To create an Advanced SNMP test:
- Click
MANAGE | Devices.- On the Manage Devices page, find the device for which you want to create a test and click Tests.
- On the Manage Tests page, click Create New Advanced Tests.
- On the Create Advanced Tests page, select the Advanced SNMP Test option. Fill in the test name, test Interval, warning and critical Thresholds, and, if desired, an Action Profile. Then fill in the following:
- Click Provision Tests.
11.3.5 Advanced Port Tests
Advanced Port Tests allow you to send a text string to a TCP port, then check the response against an expected string (the return string does not have to be a perfect match, only a substring match).
- To create an Advanced Port test:
- Click
MANAGE | Devices.- On the Manage Devices page, find the device for which you want to create a test and click Tests.
- On the Manage Tests page, click Create New Advanced Tests.
- On the Create Advanced Tests page, select the Advanced Port Test option. Fill in the test name, test Interval, warning and critical Thresholds, and, if desired, an Action Profile. Then fill in the following:
- Click Provision Tests.
11.3.6 External Tests
An External Test indicates that this test result will be inserted into NetVigil via the External Data Feed (EDF) and aggregated as though NetVigil had collected them. Although the test itself is not run by NetVigil, by creating an External test, you determine how test results will be post-processed after they are received via EDF.
- To create an External test:
- Click
MANAGE | Devices.- On the Manage Devices page, find the device for which you want to create a test and click Tests.
- On the Manage Tests page, click Create New Advanced Tests.
- On the Create Advanced Tests page, select the External Test option. Fill in the test name, test Interval, warning and critical Thresholds, and, if desired, an Action Profile. Then fill in the following:
- Click Provision Tests.
11.4 Smart Thresholds Using Baselining
Baselining is a process by which NetVigil calculates Warning and Critical test thresholds based on observed test results within a specified date range. When a test is baselined, its Warning and Critical states reflect the conditions that affect that individual test.
For example, assume that a system operator runs Device Response Tests (ICMP ping) from a DGE to Device A and from the same DGE to Device B. Device A is in the same office as the DGE, while Device B is in a branch office in another state. Acceptable Round Trip Time between the DGE and Device B is greater than that between the DGE and Device A. Rather than setting the Warning threshold for all Device Response Tests to a specific number of milliseconds, the system operator can use baselining to calculate the average RTT reported for each test over a three-month period. He can then set thresholds so that each test enters Warning state if the test result exceeds the 95th percentile of the three-month average by 10%.
The Baseline Data Set
A separate baseline is calculated for each test based on results collected for that test alone. If you use pattern matching to select multiple tests, test results are analyzed and a baseline established for each test individually. Similarly, if you specify a device name or use pattern matching to select multiple devices, NetVigil calculates a separate baseline for each test (matching the Test Name and Test Type/Subtype criteria) that belongs to the selected device(s). Results from different tests are not combined for baselining.
Each time NetVigil aggregates a test result, it stores three values: The minimum, maximum, and mean values of the tested variable over the course of the aggregation period. For example, if NetVigil is configured to store data for 1 day at 10 minute samples, and a test is set up to run every 10 minutes, in the course of a day it generates 144 test results. Each test result includes the maximum, minimum, and mean values of the tested quantity for the 10 minute period. You can generate a baseline from the maximum, minimum, or mean results within the specified date range.
Managing Baselines
The table that follows explains the items on the Baseline Management page:
maximum,minimium, ormean) that is used to calculate the baseline. See "The Baseline Data Set" on page 11-23 for more information.averageor95th percentile) used to calculate the baseline from the maximum, minimum, or mean test results.aboveorbelowthe calculated baseline. Selectaboveif the test result gets worse as it gets higher. Selectbelowif the test result gets worse as it gets lower. When the test result crosses this threshold, test status is set to Warning.aboveorbelowthe calculated baseline. Selectaboveif the test result gets worse as it gets higher. Selectbelowif the test result gets worse as it gets lower. When the test result crosses this threshold, test status is set to Critical.
- To create a baseline and set thresholds for one or more tests:
- Select the MANAGE tab.
- On the Manage Devices page, click Test Baseline Management.
- Specify the Device(s), Test Name(s), and Test Type/Subtype of the tests you want to baseline.
- Enter the date range of the test results to be used in calculating the baseline.
- Near Taking values of:, specify whether you want the baseline to be calculated from the
maximum,minimum, ormeanvalues of the test results (see "The Baseline Data Set" on page 11-23 for more information).- Near And using the:, select a method for calculating the baseline from the selected results.
- Correlate the Warning and Critical Thresholds to the baseline. For each threshold, enter a percentage above or below the baseline, and then click Submit.
- The Test Baseline Management window lists each test that matches your search criteria along with the current thresholds (in the Old Warn/Crit column) and the new values that have been calculated from the baseline (in the New Warn/Crit column). At this point, thresholds have not yet changed. Select those tests whose thresholds you want to change, and then click Done.
Note If you access the Test Baseline Management page from either the Manage Tests page or the Update Test page, some of the Baseline Management information is filled in.
11.5 SNMP MIBs Supported
11.5.1 RFC/Standard MIBs
The table that follows lists the standard MIBs supported by NetVigil. Support for new MIBs is continuously being added into NetVigil, so please contact Fidelia if you do not see a vendor MIB listed in this table.
11.5.2 Vendor-Specific MIBs
The table that follows lists the Vendor-specific MIBs supported by NetVigil.
|
Fidelia Technology, Inc. Contact Us |
|
|